The Tensorflow website has good installation instructions for the MAC OS X environment. The official installation instructions for MacOS are provided at https://www.tensorflow.org/install/install_mac. Included are instructions for virtualenv, a native pip environment, using a Docker container, Anaconda command line, and installing from sources. Although straightforward, it doesn’t include installing in an Anaconda Navigator application environment.
Anaconda is a free, open source, community supported development environment for Python and R. Anaconda manages libraries and configurable environments. It’s also a good place to experiment with scientific and machine intelligence packages. The growingly more useful Tensorflow libraries can be used to experiment within an Anacondo environment.
Anaconda Navigator is a desktop graphical user interface included in Anaconda. Packages, environments, and channels are easy to manage with this GUI. Anaconda can be installed by following the instructions at the Anaconda download site. After installation, it’s best to make sure the latest versions are installed. To quickly update using a command line interface:
$ conda update anaconda anaconda-navigator
Then, launch the Anaconda-Navigator application.
In the Navigator application, select the Environments menu item in the far left column. By default, there is one Root environment. Multiple environments with different configurations can be set up here over time. It’s typically best to upgrade existing packages to current versions. The latest version of Python should be installed (3.6 at the time of this writing) should be used.
- Select the Environments menu item in the left column.
- Select the Environment to update (in this case Root).
- Select Upgradable from the drop-down menu.
- Select the version number in the Version column to define packages to upgrade. Make sure Python is the most recent version.
- Select Apply.
To install the Tensorflow packages, a new and clean environment can be created. It will contain the base packages necessary, the latest version of Python and Tensorflow will be installed.
- Select the Create button at the bottom of the Environments column.
- In the popup menu, type ‘Tensorflow’ in the Name text entry field.
- Select the Python checkbox.
- Select version 3.6 in the drop-down menu.
- Select Create.

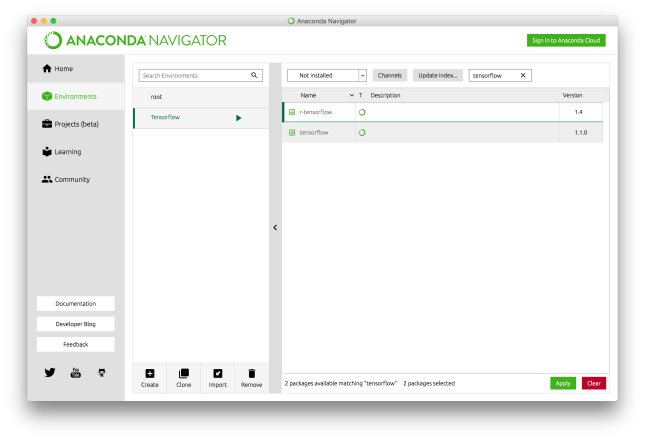
Tensorflow packages can now be installed into the new environment.
- Select ‘Not Installed’ from the drop-down menu at the top of the right window pane.
- Type ‘tensorflow’ in the Search Packages text input field and hit Return.
- Select the checkbox in the left column next to the two tensorflow package names.
- Click Apply.
To validate the installation, using the newly created Tensorflow environment:
- Make sure the Tensorflow environment is selected.
- Select the arrow next to the Tensorflow environment name.
- Select ‘Open with IPython’.
- A terminal window with the environment settings created will pop up.
- As recommended on the Tensorflow website, type the following into the terminal window
import tensorflow as tf
hello = tf.constant('Hello, TensorFlow!')
sess = tf.Session()
print(sess.run(hello))
Assuming there are no errors, the newly installed and configured environment is ready for developing with tensorflow.

